Swedish bagpipes
Reed making
|
|
|
The most difficult thing to learn about swedish bagpipes is not how
play them - it is how to make an adjust its reeds. Every bagpipe maker and
most pipers have their own idea on how to do this. This page explains
how I make reeds, with some comparisons to other styles. This is not to
say that my way to make reeds is the best way, only that it works best for me.
Is it really necessary to make your own reeds? No, you can probably
buy reeds from your bagpipe maker. But, no piper can avoid having to
adjust reeds, i.e. to tune them. And to really understand
how that works (see the section on tuning,
you should at least know how to make them in theory. Besides, it feels
a lot better experimenting with your reed if you know that you can
make a new one, should you have to.
The reed is the thing that makes the noise. Traditionally, it is in
one piece - a cylinder of cane where a tongue has been cut or sliced
out. This tongue vibrates as air flows through the reed, making the
sound.
Bagpipe reeds are made from ... reed! It is, of course, not a
coincidence that the source material and the end product carry the
same name. When talking about reed making, it is confusing, however,
so I will use the word "cane" when I mean the material - the growing
reed.
The only suitable form of cane growing in Sweden is Pragmites
australis (common reed, "bladvass" in Swedish). However,
Phragmites is fragile and sensitive to humidity, so many pipers
(myself included) prefer the kind of cane most other instrument reeds
are made from -
Arundo donax (giant reed, Spanish cane). This does not grow in
Sweden, but cane segments, cultivated on farms for the very purpose of
making reeds, can be imported (from France or Spain, for example). I recommend Alliaud Roseaux in particular, who by now should have become used to Swedish pipers and their strange (to him) reed dimensions.
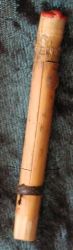
When I got started as a Swedish bagpiper, I made reeds in the
traditional way (from Phragmites australis), as taught by Leif
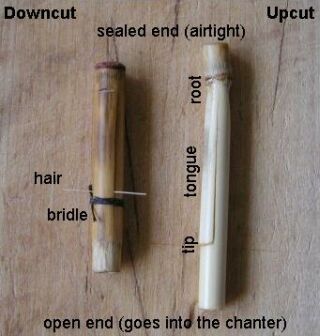
Eriksson - the nestor among Swedish bagpipe makers. "Traditional" here
means downcut, with bridle and hair (the reed to the left in the
adjoining picture - the technical terms will be explained later).
Then, in 1995, I met Alban Faust, who makes upcut reeds from Arundo
donax, without bridle nor hair (the reed to the right). That made a
drastic change to my success rate when making reeds.
My current reed making style is an inbetween, though it is much
closer to Faust's than to Eriksson's. I make upcut reeds from Arundo
donax, with bridle and hair. The bridle and hair are complements,
though, not necessities (as opposed to downcut reeds, where they
usually are).
|
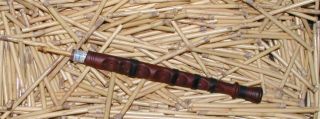
Two different kind of reeds (both for chanters in E/A). The
downcut reed to the left, with hair and bridle, is made from
Phragmites australis. Phragmites is usually not air tight in the node
end, so this end has been sealed with some sealing wax (the red "hat"
at the top). The upcut reed to the right is made from Arundo
donax. This type of reed does not require hair or bridle. Phragmites
reeds are usually (as here) shorter than Arundo reeds.
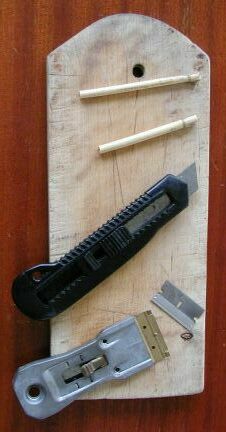
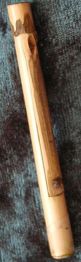
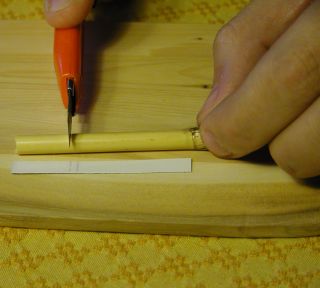
Some useful tools. Two cane segments (not cut
down to length yet, a sharp knife, a single edge razor blade and a
handle for that.
|
Getting started
I will now describe how I make reeds for a Swedish bagpipe chanter in
E/A. As I said before, I use Arundo donax. The methods I will describe
are the same if you make reeds in other materials, for chanters in
other keys, or for drones, but measures and details may differ.
Cane is hollow and grows in segments separated (also on the inside) by
nodes. On Arundo donax, the wall on the inside at the node
is usually airtight, on Phragmites australis it usually is not.
If you buy cane from a supplier, the cane has probably already been
cut so that one end is closed (by a node) and the other is open, which
is what we want. The segment should be slightly thicker than the inner
diameter of your chanter. For most Swedish E/A-chanters, this means
just over 6 mm.
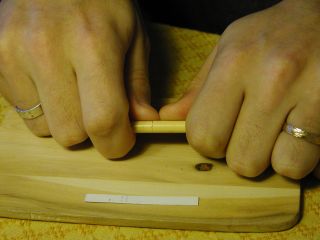
Chanter and cane segments
The cylinder should be 50-55 mm in length (measured between the node
and the open end). To shorten the cane segment to this length, I cut
around it with a sharp knife (actually, I hold the knife still and
roll the cylinder while pressing it to the knife's edge) until I'm
almost through. Then I can break it off.
I clean the inside of the cylinder with a 4mm drill and, if the node
end is not already airtight, I seal it with melted sealing
wax. Arundo donax nodes usually are airtight.
|

I use mediterranean cane (Arundo donax) for my reeds, but
if you want to make reeds the traditional way, you should harvest
common reed (Phragmites australis) in late winter or early spring,
when the ice breaks up, and use segments that have been embedded in
the ice, i.e. segments from the water line. (This being a tradition
from a country where the lakes always freeze over in winter)
Preferably, the cane you pick has had a tough life, and therefore
grown slowly and become hard. Cane from lakes or ditches by farmed
fields have most likely been over fertilized and grown too fast,
making the cane thick walled, or even solid, and porous.
The cane should be left to dry for a long time, at least a year. It
should be gold-brown when you make your reeds, not green (Arundo donax
becomes more yellow when it dries).
Before starting to make a
Phragmites reed, take the segment and try to crush it between your
thumb and the middle joint of your index finger. Really try! Of course, if
you succeed you destroy the segment, but then it was probably not a
good segment anyway.
|
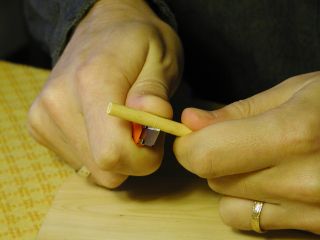
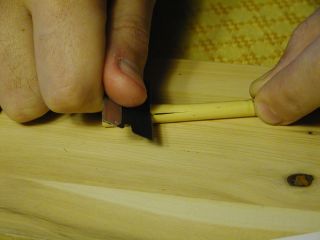
Roll the cane segment against the knife ...
|
... and then break it off.
|
Cutting the tongue
The tongue can be cut out from the reed in two ways. If you hold the
reed vertically in front of you, with the node end up and the open end
down, the tongue can be cut downwards from the node end or upwards from
the open end.
|
Downcut reeds
Downcut reeds are cut (sliced) from close to the node towards
the open end. In other words, the tip of the tongue comes close to the
node, and the root of the tongue comes close to the open end and the
chanter. Downcut reeds are usually, but not necessarily, made from
Phragmites australis cane.
|
Upcut reeds
I prefer upcut reeds, which means that I cut in the other
direction - from the open end towards the closed end. So, the
resulting tongue's tip comes close to the chanter and the root comes
close to the node. Upcut reeds are usually, but not necessarily, made
from Arundo donax cane.
|
|
Theoretically, the direction should make no difference to
functionality or sound. However, in my opinion, there is a reliability
difference, both when making the reed and when it is working in the chanter.
- Downcut reeds have the root of the tongue close to the open end
which means that the crack may creep up (due to the tongue's
vibrations), separating the tongue from the body. Downcut reeds
require a bridle - a tight wrapping of string at the tongue's root
- to prevent this. Upcut reeds do not have this problem, since the
node prevents the crack from creeping up. It also prevents
me from cutting to far, accidentally separating the
tongue from the body. Upcut reeds may have a bridle anyway, for
other reasons, but it is not required.
- Eventually, the reed will be inserted into a chanter, and it should
be a tight fit. When the reed becomes wet it swells, which induces
unwanted stuctural tensions in the reed. These tensions are more
likely to affect the tongue if it is downcut, since the root (the
tongue's "hinge") is so close to the source of the problem
(another reason for needing that bridle). On upcut reeds, the root
of the tongue is far from the source of the tensions, and the
tongue is therefore less likely to be affected.
- Tuning a bagpipe is done by tweaking various parameters on the
reed - moving the bridle, for example, if there is one. All such
adjustements to the reed have unwanted side effects. In my
experience these side effects are stronger on downcut reeds than
on upcut reeds. Many of the side effects are negligable on upcut
reeds, but must be compensated for (by adjusting something else)
on downcut reeds. However, since most upcut reeds are made from
Arundo donax and most downcut reeds are made from Phragmites
australis, it is hard to say if the difference is due to the
direction of the cut, or the material.
|
|
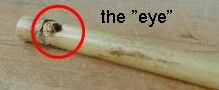
Anyway, upcut reeds it is. I start by searching for the cylinder's "eye".
This is a small bump, or indentation on one side of the cylinder,
close to the node - the remnant of a sprout having grown there, I
guess. It may not be there, but if it is, I cut out the tongue on the
other side of the cylinder. This is to ensure that the bump or
indentation does not affect the tongue (become part of it).
I then mark the tip of the tongue with a thin and sharp knife, 37mm
from the node. This is the measure recommended by Alban Faust, for
chanter reeds (of his own making). He recommends 35mm for drone reeds,
but I use the same measure for both kinds of reeds. To me, it is not
crucial that the length is exact, as long as it is not too short. If
required I shorten the tongue later, using a bridle.
I then cut down (saw down) with the knife at the mark, until I'm almost
through the inner wall of the cylinder. Then I replace the knife with
a razor blade, and push with that until I can only just see the edge
of the blade if I look inside the cylinder. Arundo donax can be very
hard, so it may prove difficult (even dangerous) to get through with a
normal, double edge, razor blade. I use a single edge razor blade
instead, of the type painters use to scrape left-over paint from
windows. There are handles for such razor blades (see the picture
above with the tools).
The next step is to crack the tongue open (to lift the tip), by
bending the blade towards the open end of the cylinder. (This is a
critical moment and it does not always succeed.) I then carefully
insert the blade under the tongue and use it as a lever, to lift the
tongue some more.
It is important to be careful here, so as not to cut away material
from the edges under the tongue (causing air leaks). Finally, I remove
the blade and bend up the tongue by hand. The crack should go up all
they way to the node (or as close to it as possible).
That I'm lifting, not cutting, allows the crack to follow fibres in
the material. Some makers prefer to cut, ignoring the direction of the
fibres. I don't. I believe (only by intuition) that the reed becomes
more reliable if it is allowed to do "what it wants"
Lifting the tongue and looking inside the cylinder, I sometimes find a
small seed (looks like a small piece of cotton) close to the node. If
so, I remove it.
By now, I have imposed quite an amount of strain and stress in the
tongue, by cutting and bending. If I'm not in a hurry (one should
not be) - I leave the reed to rest for a few hours. When I come back, the
tongue has relaxed a bit (lowered itself towards the body).
I now try blowing through the reed, by inserting it in my mouth, node end
first, almost all the way (so that the tongue can vibrate freely
inside). Eventually, when the reed is finished, this should
produce a crisp and steady tone, slightly above E (upper E on your
chanter, i.e. the highest note on most E/A-chanters) (Sound example).
Most likely, though, the reed does not sound right yet, if it sounds at all.
There are two probable reasons for this - the tongue may not be
elevated enough (from the body) and may also be too stiff (thick).
|
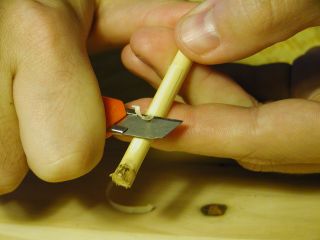
Mark the tongue's length and saw with the knife (the white piece of
plastic is a template, 55 mm long and with marks at 35 and 37 mm)

Push down with a razor blade
Crack the tongue open
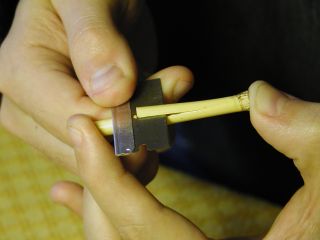
Lift the tongue, using the razor blade as a lever
|
Thinning out the tongue

Workshop in Gagnef
Photo: Anne-Marie Eriksson
|
Tongue scraping
It is very difficult to explain in words how stiff the tongue should
be. When lifting the tongue, after only a few millimeter the tongue
starts resisting, as if it doesn't want to be lifted more than that.
The tongue should feel stiffer than the tongue of a jews harp, softer
than picking a guitar string (but close).
Reeds made from Phragmites australis seldom requires tongue scraping,
but Arundo donax reeds usually do. The sound of a reed with too thick
tongue, if it makes a note at all, is hard and raw and much sharper
(higher) than the top E of the chanter.
To make the tongue thinner I slice with a sharp knife along the full
length of the tongue, from the root to the tip. Slicing is risky,
though, in that it is easy to cut away too much. Scraping with the
knife instead is slower, but safer.
About the only irreversible mistake one can make to a reed, is to make
it too thin. Most other mistakes can be counteracted, but if the tongue
becomes too sloppy, we're in trouble. A layer of nail polish applied
to the tongue might help, but it is probably better to start all over.
|
Lifting the tongue
If the reed won't let any air through at all, or if it shuts close
almost immediately when trying (listen
to this), the tongue should be lifted from the body. This can be
done in two ways.
- The traditional way is to insert a hair under the tongue,
close to the root. This should prevent the tongue
from closing and will also lift it some (depending on the thickness
of the hair). At this stage, however, I would do it another way.
- The other way is to heat set the tongue.
This is done by lifting it (more than actually wanted) and
heating it with an open flame. One or two quick passes (along the
whole length of the tongue) should be enough. When the tongue is
released, it will go back towards the body again, but not all the
way. In a similar fashion the tongue can be lowered again, if
necessary, by pressing it against the body while heating.
If the tongue is lifted too much the reed may become strong
and stable, but the pitch will be flat (too low). The reed requires
too much air pressure, and you can hear that it does not start
directly when you start to blow - there is a hiss as air goes through
it, just before it actually starts to sound.
Sound example.
Leif Eriksson does not heat set at all, I think. As far as I know, he
only uses the hair method - perhaps (probably) heat setting is more
risky when working in Phragmites australis. Alban Faust on the other
hand, never uses hair (nor Phragmites). I do use a hair, but not at
this stage.
|

Heat setting of the tongue
This is an E/A-chanter reed. It is fully functional and well in
tune (and has been for almost a decade when I write this). As you
can see, the tongue does not have to be lifted much - the
elevation is actually almost unnoticeable. Note also that this reed
has both a bridle (a short piece of plastic hose) and a hair.
|
My reason for having a bridle and a hair
Upcut reeds do not require bridle or hair. However, I have found it
convenient to use them anyway.
When having made a reed, it works properly, and the chanter is in
tune, I insert a hair which is so thin that it makes almost no
difference to the tuning of the chanter (I pick the hair from my
arm). Indeed, the hair is not there for tuning, only to prevent the reed from
stopping when wet - a wet tongue is less rigid than a dry one and will
tend to go back towards the body.
I do use a bridle for quick fine tuning, though. But instead of a
tight wrapping of string, I use a plastic ring cut from a 5mm (inner
diameter) plastic hose. The inclusion of a bridle makes the measured
length of the tongue, when cut out, less critical. Also, I sometimes
impregnate my reeds by dipping them in almond oil. This makes the
tongue heavier (it sucks up some of the oil - that's the point) and
the bridle may be needed to shorten the tongue, to compensate. By the
way, if you also want to impregnate your reeds, use almond oil or
olive oil, not linseed oil! Linseed oil leaves a residue which clogs
the reed.
|

A man (Hans Rönnegård) and his reed making toolkit Photo: Anne-Marie Eriksson
|
Summary
This is how I make reeds, in short:
- I take a cylinder of cane, about 6mm thick and with one end
sealed by a node. I cut it to length, 50-55 mm, measured from the
node.
- I mark the tongue's tip 37 mm from the node. If the cylinder has
an "eye", I do so on the other side.
- I saw down at the mark with a sharp knife, until I'm almost
through the wall. I then replace the knife with a razor blade and
press down until the edge of it is only just visible from the inside.
- I crack the tongue open, bending with the blade, and then use
the blade as a lever to lift the tongue further. The last bit, I
lift by hand.
- I let the reed lie for a few hours.
- I thin out the tongue until its stiffness feels right.
- I lift the tongue slightly from the body, by heat setting.
Step 4 and 6 are the critical ones - where fatal mistakes are most likely.
|

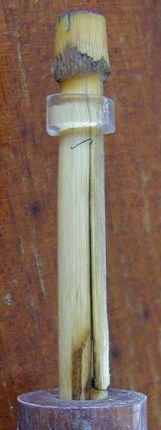
Finished, but not yet adjusted, reed
|
Trouble shooting
| Problem |
Solution |
| The reed won't let any air through at all |
Lift the tongue or move the bridle(*) towards the tip. |
| The reed starts to sound, but shuts close immediately
or
The reed sounds, but the pitch varies a lot with air
pressure |
Lift the tongue or move the bridle(*) towards the tip.
In the worst case, the tongue is too thin. If so,
not much can be done. |
| The reed lets air through, but makes no sound
(except the hiss of air passing through)
or
The reed requires very high air pressure to
sound. |
First, lower the tongue or move the hair(*) towards
the root.
If that does not work, thin out the tongue. |
| The reed sounds and is steady, but the produced note
is much sharper than the top E of the chanter |
Thin out the tongue. |
(*) if you have one ...
The next step is to try the reed in the chanter. See the section on
tuning.
|
(Maintenance) Previous page || Next page (Tuning)
|