Swedish bagpipes
Instrument care
|
On this page, I have collected various tips and trick, mostly about
maintenance of the instrument itself. Peter Frodemo contributed to
major parts of this page, in particular to the sections on bag
seasoning and maintenance.
|
Bag seasoning
It is very important that the
bag is airtight. It should not be possible to squeeze any air from a
bag with plugged openings. Even a very small leak may make it noticably
harder to play the instrument and also affect tuning, since leaks make
it more difficult to maintain a constant air pressure.
There are many recipes for bag seasoning which makes the bag airtight. Here is one which works very well.
- Buy hide glue (in granulated form), glycerine
(glycerol) and a conservative such as Atamon (sodium benzoate, or
whatever your old grandmother used when she conserved lemonade).
- Pour two table spoons of hide glue in a can. Cut the top off a beer can or use a plastic cup.
- Pour water over the glue, so that it covers the glue by about 0.5 centimetres (1/5").
- Put
the can in a pot of simmering water on the stove and stir until the the
glue is completetly dissolved. The liquid should now have the
consistency of unwhipped cream.
- Add glycerine, about 4 times as much as there is glue in
the can. Also add a table spoon of Atamon (or whatever conservative you
use).
- Stir and then let the solution cool down a bit.
- Remove all pipes from the bag and plug the holes for chanter and drone with cork.
- Pour
about 1.5-2 decilitres (less than a cup) of the solution into the bag,
through the hole for the mouth piece. Knead it thoroughly into the bag,
and particularly at the seams and around the stocks.
- Insert the mouth piece and carefully blow som air into the
bag. Don't blow it up too much, just so that the insides don't stick to
each other.
- When the bag can't suck up more seasoning, remove the
corks and mouth pipece and hang the bag up, upside-down, so that excess
seasoning can drip out. Let it hang for a day or two.
The inside of the bag may remain sticky for a few weeks, but don't
worry, the sides won't glue together. Excess seasoning can be stored in
a bottle or jar with a tight seal. If kept cool it will last for a long
time and can be used again after carefully heating it up again in a
water bath or in a microwave oven. If you use a microwave, heat it up
in steps, 5-10 seconds at the time. Don't let it become hot.
Air valve
The bagpipe's mouthpiece has a one-way valve attached to the end which
goes into the bag. This is to prevent air from escaping back out
through the mouthpiece, so it should be absolutely airtight. Two types
of valves are common, the classic leather valve or a rubber valve. Both
work great, but leather valves may require some maintenance to keep
them airtight.

Leather valve
The leather valve stiffens over time and may require the occasional
application of some some olive oil or almond oil to soften it up. A
valve that feels soft but still won't stay airtight can be greased with
some vaseline to make it sticky. Leather valves often work better if a
second half circle of leather is glued to its "free" end, to make it
heavier.

Rubber valve
The rubber valve consists of a "cap" of rubber, attached to a metal
tube at the inner end of the mouth piece. It is essentially maintenance
free and should work perfectly for many years (*). The disadvantage is
that if it starts to leak there is not much else to do than to replace
it. Go to a kite makers store - kite makers use this kind of rubber
caps to protect the ends of the kite frame. Cut the "lid" with a sharp
hobby knife or razor blade.
N.B. When the above picture was taken, I blew air through the
mouthpiece to make the lid visible (to open it). It stays closed when
resting, and the crack can hardly be seen.
(*) The mouthpiece in one of my bagpipes has been stuck, as if
glued into the bag, for 14 years when I write this - fortunatey, I've
never had to adjust the valve, it works perfectly.
|
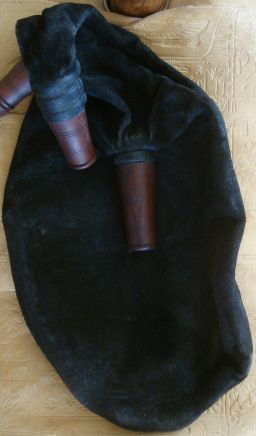
Stiff bags
Nowadays, most bagpipe makers use
chrome tanned hide when making bags and such bags usually don't require
much maintenance. But there are also bark tanned bags around and those
can get stiff or even hard after a few years. To review a stiff old
bag, go to a saddle maker and buy some saddle oil.
- Remove chanter and drone from the bag, and cork the openings. Leave the mouthpiece where it is.
- If the bag is not too stiff, blow it up (carefully if very stiff).
- Knead saddle oil into the outside of the bag, all over and particularly around the seams.
- Let the air out, and knead the bag until it has sucked up all the oil it can take.
- Let the bag rest for a few hours.
- Repeat if necessary.
Warning: Oiling the bag will most likely make it a lot darker, and it won't let moisture through as well as it did before.
Watertrap
Your reeds' greatest enemy is
humidity, and it does get rather moisty in a mouth blown bagpipe bag.
One way to do away with some of the problems associated with moisty
reeds is to get a bellows blown bagpipe. But there is another, very
simple and cheap solution, and elegant at that since it is invisible;
Make a watertrap!
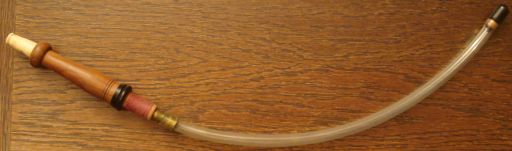
The idea is to lengthen the mouthpiece inside the bag using a
plastic hose. Some moisture will condensate on the inside walls of the
hose, but the main point is that the air enters the actual bag at the
back, far away from the reeds. That way, the bag itself will catch much
of the moisture before it reaches the reeds. So, to be precise, it is
the bag which is the real watertrap here, not the hose.
The effect is almost like playing a bellows blown bagpipe, i.e.
you can set your reeds to work best when dry. That means that you can
just pick up your bagpipe and start playing, without having to "warm"
up first. If you set up your reeds like that in a mouthblown bagpipe
without watertrap, they will quickly go out of tune when the humidity
gets to them. With a watertrap it takes much longer (several hours in
my experience) before you get tuning problems.
If your mouthpiece is equipped with a rubber valve, it is very
easy to make a watertrap. Just remove the rubber cap from the metal
tube it is attached to, attach the hose there instead. Now, insert a
similar metal tube, halfway, into the other end of the hose so that you
can attach the rubber cap there.
If you have a leather valve, the detaching and attaching of the actual
valve gets more tricky, but the principle is the same. I recommend
taking this opportunity to replace the leather valve with a rubber one.
Widen the mouthpiece bore at the inner end, so that you can insert a
metal tube there with the same inner diameter as the rest of the
mouthpiece.
The watertrap has some drawbacks, but in my opinion the
advantages outweighs the disadvantages by a great margin. The sound of
blowing air into the bag gets louder with a watertrap, and it is a bit
harder to blow since the tube is longer. If the hose is too long, the
valve may hit the back end of the bag and temporarily stop working. If
so, just shorten the hose a bit. Another disadvantage is that the bag
won't be as easy to fold when you put the instrument away. The
mouthpiece stays rather rigid and won't fall down towards the bag if
you release it while playing, which to me is an advantage since I often
do.
|
Rubber rings
Bees-wax is
often used to tune individual notes on the chanter. That works well,
and for semi-permanent tunings I use it as well. However, it is a bit
cumbersome to use bees-wax for holes that often needs fine tuning, e.g.
the minor/major double hole under the upper hand long finger, or the
bottom hole (E on an E/A chanter). The same goes for the the tuning
hole(s) on the drone.
For many years, I have used rubber rings instead, cut from a
bicycle hose (thin hose, for racing bikes). There are some
disadvantages do that, though. The rubber, most often black, can stain
the wood, and when used for the major/minor double hole I have had
problems with air leaks under my finger when playing the chanter tuned
to a minor key. The colour as such may be an aesthetical problem.
Bicycle hose does exist in other colours, but most bicycle shop owners
are not used to customers who care, so they are not easy to find.
A better alternative, at least for the major/minor double hole,
is to cut rings from the little finger of a dish washing glove - the
cheap common type in rubber. The inside of such gloves are often lined
with thin white felt. I turn these rings inside out, rubber side
towards the chanter. That way, the colour of the rubber is not an issue
and, in addition, it makes a tighter seal. Rubber gloves are thinner
than the walls of bicycle hose, so the risk of leaks under the
finger(s) is reduced. On the other hand, the rings are not as easy to
move up and down along the chanter, as the bicycle hose rings are.
Therefore, I still have a bicycle hose ring at the bottom, for the low
E, since I often retune that note with my right hand pinkie while
playing.
There are even thinner rubber gloves, in latex - the kind used
in hospitals, for example. In my opinion they are too thin and even
harder to move around.
|
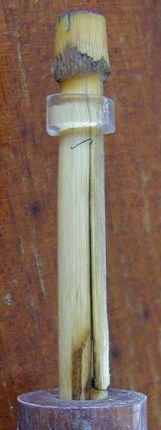
A reed's life
Musicians on
other reed instrument change their reeds often. Oboists, for example,
often make their own reeds and replace them at least once a week. But
Swedish bagpipe reeds seem to last for a long time, no one knows for
how long. Two of my reeds (the one to the right is one of them) are 14
years old when I write this. I know of reeds in daily use that are more
than 25 years old.
So, it is unlikely that you play your reeds to their
death, and old age does not seem to be a problem either. An accident is
more likely, and that can happen anyone, anytime. Therefore it is a
good idea to keep your reed making skills in shape, and to have spare
reeds with you at all times (and to play them regularly).
|
Wood maintenance
When a bagpipe is made, the wooden details
must be treated in some way to make them resistant to moisture, among
other reasons. It is common to oil them in, or to varnish them with,
for example shellack. Some people claim that oiled wood needs to be
retreated quite often, once a year or so, to prevent cracks from
developing. In my opinion this is an exaggaration and the risk of
cracking shows tell-tale signs of urband legend.
If your bagpipe was made in softer wood (birch is common for
Swedish bagpipes) and if they were oiled in when crafted, you may have
to oil them in again once or twice in the instrument's lifetime, not
more. Varnished wood should not need treatment again, ever. I have not
oiled in any of my instruments (of any kind) since 1995, and have so
far not noticed any problems due to that.
But, if you want to oil your wooden parts anyway, soak them in
a 50-50 mixture of terpentine and linseed oil (boiled). Swedish
bagpipes are rarely made from materials too hard for this mixture to
penetrate, but if you have details in harder woods, like ebenholz,
bubinga, african blackwood or similar, use a thinner oil. Almond oil,
for example.
|
Unwanted resonance
Not many pipers ever experience this
problem, but for those who do it can be very confusing; resonance
between the chanter and drone reeds. The risk of this happening depends
on many factors, for example the bag's shape and the distance between
drone stock and chanter stock.
A typical effect of resonance between chanter and drone reeds is
that the chanter suddenly goes out of tune when you switch the drone on
or off. Another effect is that the drone may refuse to fine tune - when
you move the tuning slide, nothing happens, then nothing, then suddenly
the tone moves drastically. Like ketchup from a bottle. In both cases,
the resonance keeps the reeds locked to a particular frequency. If that
frequency happens to be the right frequency, fine, but few are that
lucky.
If you are among the few who experience this, try doing some
minor adjustment to one of the reeds (preferably the drone reed). If
that does not work, try replacing one of them. If that does not help
either, or if you have no spare reeds, you can try to insulate the bag
by inserting a piece of foam rubber through one of the stocks.
|
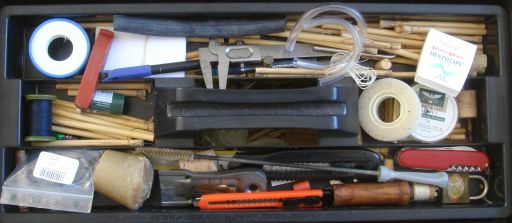
Things that are good to have
Most Swedish pipers I know are very inventive, often using things
for other purposes than they were intended for. For example the
abovementioned bicycle hose or dish washing glove. My toolbook is full
of various things of practical use. Here is a list.
- dental floss, strong sewing thread, thread seal tape (teflon tape), used to wrap joints.
- toothpicks, to pick out or fine tune bees-wax in the finger holes.
- a weapons brush for air guns, a 4mm drill, or a round chainsaw file, to clean out the pipes when needed.
- tweezers, used to move the hair (if you have them) under the tongue of your reeds.
- o-rings or cut pieces of a thin plastic hose, used as bridles for the reeds
- cigarette lighter, to adjust reeds and to melt (weld) bees-wax when doing semi-permanent retuning of finger holes.
- cut fingers from a dish washing glove or bicycle hose, used to retune finger holes and the drone
- hobby knife, small cutting board, caliper, razorblades, lacquer, reed segments, used in reed making
- bees-wax, for reed making and finger hole adjustments
|
(Tunes for beginners) Previous page || Next page (Reed making)
|